Basement Waterproofing NJ Solutions for Leaky Corners and Wall Joints
@charliekdlm907
September 24, 2026 · 16 min read
A wet basement rarely starts with a dramatic flood. More often, it begins with a damp corner, a chalky white stain on the wall, or a dark seam where two surfaces meet. Homeowners in New Jersey see this pattern all the time, especially after heavy rain, snowmelt, or long stretches of humid weather. What looks minor at first can turn into peeling paint, musty air, mold growth, damaged flooring, and eventually structural trouble if water keeps finding the same path.
Leaky corners and wall joints are among the most common basement moisture problems in this region. They are also some of the most misunderstood. Many people assume the solution is simply to seal the inside wall and hope for the best. Sometimes that helps for a while. Just as often, it covers the symptom while the real pressure builds behind the wall.
Basement waterproofing in New Jersey has to account for local conditions. Much of the state deals with clay-heavy soil, high seasonal groundwater, older foundations, freeze-thaw cycles, and houses built in phases over decades. Those factors matter. They explain why water often appears at the cove joint, in an inside corner, or along the seam where poured concrete meets footing. If you want a repair that lasts, you have to know why the water is showing up there in the first place.
Why corners and wall joints leak first
Water follows the path of least resistance. In a basement, the weakest points are often not the flat middle sections of a wall. They are the transitions: corner intersections, cold joints, floor-to-wall seams, tie rod holes, pipe penetrations, and cracks that open slightly as the house settles and the soil shifts.
An inside corner can leak because two walls meet there, creating a natural stress point. If either wall develops hairline cracking or if hydrostatic pressure builds outside, that corner becomes an easy entry route. Wall joints leak for similar reasons. In poured concrete foundations, the joint between the wall and footing is a common water pathway. In block foundations, mortar joints can deteriorate over time and allow moisture to move inward. Even in basements that look structurally sound, water can seep through these transition lines before it ever pushes through the center of a wall.
In New Jersey, this gets worse after repeated wet-dry cycles. Soil expands when saturated and contracts when it dries. That movement places pressure on foundation walls. Add winter freezing and thawing, and minor vulnerabilities can widen. I have seen basements that stayed mostly dry for years until one unusually wet spring revealed every weak seam at once.
The location of the leak tells part of the story. A damp patch halfway up the wall points to one kind of problem. Water collecting at the wall-floor seam points to another. Rust stains below a window well tell you something different again. Good waterproofing work starts with diagnosis, not guesswork.
The difference between seepage, condensation, and active intrusion
Homeowners sometimes describe all basement moisture as a leak, but not every wet area has the same cause. That distinction matters because the wrong fix wastes money.
Condensation forms when warm, humid air hits a cool basement surface. It often shows up on pipes, ductwork, or walls during humid summer weather. The water looks clean, beads on the surface, and may be worst when the air conditioner is running unevenly or ventilation is poor. That is not foundation seepage, even though it can leave a damp smell.
Seepage is moisture moving slowly through porous materials or tiny openings. It may leave efflorescence, that white powdery residue on masonry. It can make paint bubble or create a darkened line along a joint. Active intrusion is more obvious. That is the water you can see entering through a crack, seam, or corner during or shortly after rain.
Leaky corners and wall joints usually involve seepage or active intrusion, not simple condensation. The practical test is timing. If the problem worsens during storms, after snowmelt, or when the ground stays soaked for days, exterior water pressure is likely driving it.
What causes hydrostatic pressure in New Jersey basements
Hydrostatic pressure sounds technical, but the basic idea is straightforward. When soil around your home becomes saturated, water builds pressure against the foundation. If there is no easy path for that water to drain away, it presses against walls and footings until it finds a gap.
This is especially common in neighborhoods with poor yard drainage, compacted backfill, undersized gutters, short downspouts, or lots that pitch toward the home. In older parts of New Jersey, many houses were built before modern drainage standards became routine. Some have stone foundations, some have aging block walls, and many have exterior coatings that have long since failed.
One home may need only gutter corrections and a modest crack repair. Another, just a few blocks away, may need an interior drainage channel and sump system because the water table rises seasonally. Broad advice does not help much here. Basement Waterproofing NJ work is highly site-specific.
The clues a basement gives you before the real damage starts
Basements are honest spaces. They show problems early if you know where to look. A musty odor after rain is one clue. A damp carpet edge in a finished basement is another. Efflorescence on block walls, blistering paint, swollen baseboards, rusted metal shelving, and warped laminate flooring all point toward chronic moisture.
Pay close attention to repeated wetness in the same corner. That pattern usually means the problem is not random humidity. It means water has established a route. If the route is at a wall joint, the moisture may travel under finished flooring before becoming visible. That is why a small leak often causes more damage than homeowners expect. The wet area you can see is not always the full wet area.
I have also seen homeowners dismiss a little water because it drains toward a floor drain and disappears. That can mask the seriousness of the issue. If the wall remains damp and the humidity stays elevated, the basement can still support mold growth and wood rot even without standing water.
Interior sealants have a place, but they are not a full strategy
There is a reason waterproofing paints and sealants sell well. They are inexpensive, easy to apply, and can improve the appearance of a basement quickly. In some situations, they are useful as part of a larger system. But they rarely solve leaky corners and wall joints by themselves.
When water pressure is pushing from the outside in, a coating on the inside wall is in a defensive position. If the pressure is mild and the substrate is sound, the coating may hold for a while. If the pressure is persistent, the bond eventually fails. You see peeling, bubbling, or new dampness at the edges.
That does not mean interior products are worthless. It means they should be used with judgment. A quality cementitious patch at a localized opening can help. An interior vapor barrier can work well when paired with drainage. But if someone promises that one coat of waterproof paint will fix chronic water at the cove joint, skepticism is healthy.
Exterior grading and drainage often solve more than people expect
Some of the best basement waterproofing work starts above ground. If roof runoff empties beside the foundation, or the soil slopes inward toward the house, you are feeding the problem every time it rains.
Correcting grade is not glamorous, but it is effective. The ground should slope away from the house so surface water drains outward rather than pooling at the wall. Downspouts should discharge well away from the foundation, not into a splash block that ends a foot from the wall. Gutters need to be clear and sized properly for the roof area they serve.
Here are a few exterior issues worth checking before moving to major interior work:
- Downspouts that empty too close to the foundation
- Settled soil next to the house that creates negative grade
- Clogged or undersized gutters that overflow during heavy rain
- Window wells that collect water without proper drainage
- Hardscape surfaces pitched toward the home
These are not cosmetic details. They directly affect the water load against the foundation. On some homes, correcting them dramatically reduces basement moisture. On others, they reduce the burden enough that interior systems work far better.
When exterior excavation is the right call
There are cases where the only durable fix is from the outside. If a foundation wall has significant cracking, failing exterior coating, blocked footing drainage, or obvious water entry through a specific outside defect, excavation can make sense.
Exterior waterproofing usually involves digging down to the footing along the affected wall, cleaning the foundation surface, repairing cracks or gaps, applying a waterproof membrane, and installing or replacing drainage components. Done properly, it addresses the problem at the source by preventing water from pressing directly against the wall.
The trade-off is cost, access, and disruption. Excavation is harder if there are decks, patios, driveways, porches, mature landscaping, or tight property lines. It also tends to be more expensive than interior drainage solutions. Still, for some foundations, especially when there is structural repair involved, it is the most appropriate path.
A good contractor should explain why exterior work is necessary rather than treating it as the default answer. If a leak is localized to one corner due to an exterior grading issue and a failed crack seal, selective excavation may be enough. If the whole foundation is taking on water, a broader approach may be justified.
Interior drainage systems and sump pumps, where they shine
Not every basement leak can be prevented by stopping water before it reaches the wall. In many New Jersey homes, especially where groundwater rises seasonally, the practical solution is to manage water once it reaches the footing area and move it away quickly.
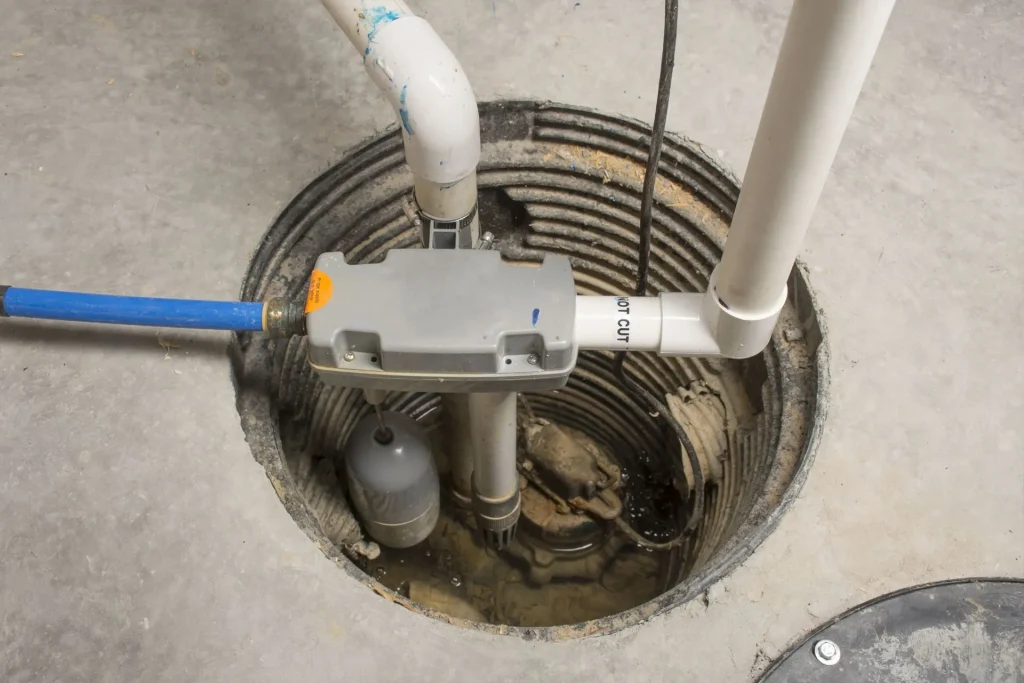
An interior drainage system typically involves opening the perimeter slab, installing a drainage channel along the footing, and directing collected water to a sump basin. From there, a sump pump discharges the water safely away from the house. This approach does not usually stop water from entering the outer side of the foundation. Instead, it relieves pressure and captures the water before it reaches the living space.
For leaky wall joints and cove seams, this can be highly effective. Water entering at the wall-floor intersection is intercepted and removed. When paired with a wall vapor barrier on masonry surfaces, the basement becomes much drier and easier to finish safely.
The key is design and installation quality. A sump system should have the right pump capacity, a reliable check valve, and an exterior discharge line that will not dump water right back against the house. In areas prone to storms and outages, battery backup is worth serious consideration. It is frustrating to install a waterproofing system only to have it fail during the exact storm when you need it most.
Crack injection for corners and joint leaks
Some leaks come from distinct cracks rather than broad seepage. In poured concrete foundations, polyurethane or epoxy injection can be a useful repair. Polyurethane is flexible and often chosen for active water leaks because it can expand into the crack path. Epoxy is more structural in certain applications but is generally used when the crack is dry and stability is the goal.
Crack injection works best when the leak path is identifiable and the wall itself is otherwise sound. A vertical crack near a corner that opens slightly under pressure may respond well to injection. A long history of water at the entire cove joint, on the other hand, usually points to a drainage issue that injection alone will not solve.
That distinction matters because some homeowners are sold a narrow repair when the condition calls for a system. Others are sold a full perimeter system when one isolated crack is the real culprit. Experience helps separate those cases. So does inspection during or shortly after wet weather, when the evidence is fresh.
Block foundations require a different mindset
Many New Jersey homes have concrete block foundation walls. These behave differently from poured concrete. A block wall has hollow cores and many mortar joints, which means water can travel inside the wall before becoming visible. It may show up several feet away from the original entry point.
That is why a damp inside corner in a block foundation can be deceptive. The visible leak may be the end of a longer route. Surface patching one spot often disappoints because water simply reappears elsewhere along the same wall.
Interior drainage is often a strong option for block walls because it gives that trapped water a place to relieve itself. In more severe cases, contractors may drill weep holes at the base of the wall to drain the hollow cores into the interior perimeter system. If that sounds counterintuitive, consider the alternative: water trapped inside the wall with nowhere to go but into your finished space.
What a thorough inspection should include
A basement waterproofing estimate is only as good as the inspection behind it. A serious evaluation looks beyond the wet corner itself. It considers the entire water picture around the home, from roof runoff to grading to foundation type to signs of movement or settlement.
A strong inspection usually covers these points:
- Where the water appears, and under what weather conditions
- Whether the foundation is poured concrete, block, stone, or mixed
- Exterior drainage conditions, including grade, gutters, and downspouts
- Evidence of structural cracking versus cosmetic surface defects
- Humidity levels and signs of hidden moisture damage in finished areas
That scope matters because basement problems often overlap. A house can have poor grading, one leaking crack, and elevated humidity at the same time. Solving only one part leaves the basement vulnerable.
Finished basements raise the stakes
A leak in an unfinished utility basement is annoying. A leak in a finished basement is expensive. Drywall, insulation, flooring, trim, built-in shelving, and furniture all suffer when moisture gets behind finished surfaces. Worse, damage can go unnoticed for months if the visible face remains dry while the backside stays damp.
This is where prompt action pays off. If a corner leaks once, do not wait for the next storm season to see if it returns. Open up suspect areas if needed. Moisture meters, thermal imaging, and a careful visual inspection can reveal how far the dampness extends.
The repair strategy may also change in a finished basement. Interior drainage systems can be installed with relatively limited disruption compared with exterior excavation, which appeals to many homeowners. But if water is entering through a specific exterior defect behind an expensive finished wall, targeted exterior work may actually preserve more of the interior in the long run.
Cost, trade-offs, and how to think about value
Waterproofing costs vary widely because the conditions vary widely. A simple crack injection or localized repair may cost a small fraction of what a full perimeter system or exterior excavation would cost. That range can frustrate homeowners who just want a quick number over the phone, but square-foot pricing alone is not useful when the cause has not been identified.
Value comes from matching the repair to the failure mode. A lower-cost repair that does not address the real water path is not cheaper in any meaningful sense. It only delays the larger bill. On the other hand, a broad, expensive system is not a better solution if the issue is isolated and straightforward.
Ask what the repair is designed to do. Is it stopping water at the exterior surface, relieving pressure at the footing, sealing a crack path, or controlling interior humidity? Those are different goals. The best Basement Waterproofing NJ contractors explain the logic, not just the price.
Choosing a contractor without getting lost in sales language
Waterproofing attracts both skilled specialists and aggressive sales operations. Homeowners often hear confident promises, but confidence is not the same as diagnosis. The right contractor should be comfortable discussing why water is entering at a corner or joint, what alternatives exist, and what limitations each option has.
Look for people who inspect inside and outside, ask about weather patterns, and notice details such as downspout discharge, slab cracks, and signs of prior repairs. Be cautious if someone recommends a major system after a ten-minute look at one wall. Be equally cautious if someone dismisses recurring seepage as nothing more than condensation without investigating further.
A trustworthy recommendation usually has nuance. It might be, for example, that the basement needs grading correction first, then monitoring, or that the rear wall needs selective exterior excavation while the rest of the basement would benefit from interior drainage. Real-world houses rarely fit cleanly into one-size-fits-all packages.
Long-term prevention after the repair
Once the leak is fixed, the goal shifts from rescue to prevention. Keep gutters clean. Extend downspouts far enough away from the house. Recheck grading every few years because soil settles. Make sure sump pumps are tested, especially before storm season. In humid months, run a dehumidifier if the basement tends to hold moisture even after waterproofing work.
Small maintenance habits matter more than most people think. I have seen solid waterproofing systems undermined by a disconnected downspout extension or a buried discharge line that froze in winter. The foundation may be repaired perfectly, but the site still has to handle water responsibly.
Leaky corners and wall joints are warnings, not random annoyances. They tell you where the basement is under stress. Addressing them early is usually simpler, cleaner, and less expensive than waiting until the problem spreads into flooring, framing, and air quality issues upstairs.
For homeowners dealing with recurring dampness, the right next step is not another coat of paint. It is a clear diagnosis of where the water starts, how it travels, and which remedy https://felixnwht357.brightpathdigest.com/posts/seasonal-basement-waterproofing-nj-maintenance-tips-for-homeowners actually matches the condition. That is what separates a temporary patch from waterproofing that holds up through New Jersey rain, snowmelt, and the kind of stormy weeks that put every foundation to the test.
ARD Waterproofing
Address: 98 Smull Ave, West Caldwell, NJ 07006
Phone number: +12016465936
FAQ About Basement Waterproofing NJ
What is the best waterproofing method for a basement?
The best overall approach to waterproofing a basement is a combined exterior and interior system that stops water at the foundation wall and safely manages any moisture that gets through.
What is the average cost to waterproof a basement?
The average cost to waterproof a basement ranges from $2,500 to $15,000, with most homeowners paying around $5,200 for a complete project.
Can a basement be waterproofed from the inside?
Yes, a basement can be waterproofed from the inside, and it is often the most affordable and least disruptive method.